
.png)
Suit up your crew in turnout gear, PPE and flotation devices, using rope rescue equipment for these three ice rescue training drills Note: This article originally appeared November 20, 2017 on
By Robert Avsec
Disclaimer: I am not an experienced ice rescue technician. But I’m guessing that neither are many of you who are reading this article. I’m also guessing that many of you live in areas of the U.S. and Canada where it won’t be too long before ponds and lakes start freezing over. And it won’t be too long after that that people will start heading for those frozen bodies of water to pursue winter recreational activities like skating, ice hockey, ice fishing and the like. If I’m speaking of the sort of area where you live, and you’re a firefighter or EMS provider, you also realize that being presented with a person who has fallen through the ice and needs rescue is not a question of if, but rather when.
In this article, I’m going to present a sample preparation and several training exercises for use by fire departments that:
1. Have the potential for ice rescue,
2. May or may not have ice rescue equipment, and
3. May or may not have access to experienced ice rescue personnel.
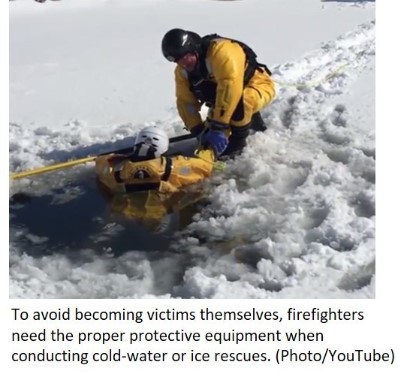
Ice rescue brings a set of equipment demands that turnout gear (and most of the equipment currently carried aboard your fire apparatus) cannot meet. A good place to get started is to obtain the basic equipment your department really needs to have. To avoid becoming victims themselves, firefighters need the proper protective equipment when conducting cold-water or ice rescues. The right PPEwill guard against hypothermia and keep rescuers afloat.
SET THE STAGE FOR FIREFIGHTER TRAINING EXERCISES
These exercises are designed to take place on dry land with the tools, equipment and PPE that you probably already have on your fire apparatus. And that’s OK, because what’s of the utmost importance is developing and practicing a rescue process. The basic process can only improve as your department is able to add equipment and PPE specifically designed for ice rescue.
What you’ll need:
• A clean 55-gallon steel or plastic drum
• The tools necessary to dig a hole big enough to bury the drum to ground level
• A 35-foot extension ladder
• Two or more rope-rescue throw bags
• Two or more certified life-safety ropes, 200 feet or longer each
• A flat parcel of land at least 100 feet by 100 feet in dimension
First, dig the hole in the center of the parcel of land you’re using. Dig it deep enough so that the rim of the barrel is level with the ground. The buried drum will be your hole in the ice from which rescuers will either:
1. Direct the victim in self-rescue or
2. Work as a team to reach and extract the victim from the “ice.”
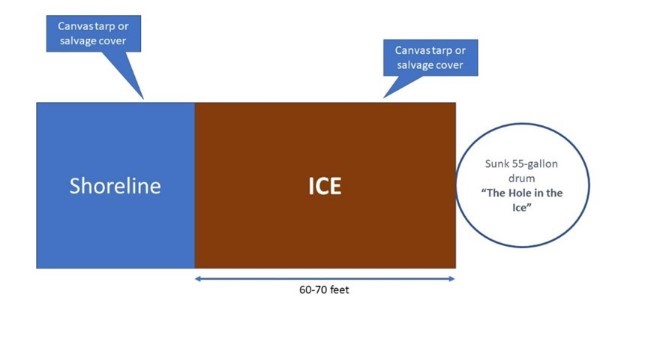
Spread a salvage cover or canvas tarp to cover the ground between your hole in the ice and the “shoreline” from which participants will be working.
ICE RESCUE EXERCISE NO. 1: VICTIM SELF-RESCUE For this training exercise, set up the scene using Figure 1 below as your guide:

Hey, any good training exercise calls for a bit of acting skills, right? The goal of this training exercise is to get the right script into the heads of your people. A real ice rescue incident is no time for an impromptu performance. As one of my mentors always said, “Doing something on the emergency scene for the first time will always be nothing less than exciting ... and usually dangerous for someone.”
Check out this outstanding articleabout ice rescue from my FireRescue1 colleague, Dalan Zartman. Dalan is a technical-rescue curriculum subject-matter expert for the Ohio Emergency Management Agency and Department of Homeland Security. He has taught more than 100 technical-rescue courses at Bowling Green State University, where he serves as regional training program director and advisory board member.
According to Dalan, assessing the victim should account for the first two or three applications in the rescue sequence. If the victim appears responsive and capable, coach them through self-rescue using the following commands:
Command No. 1: "Stick your hands and arms out on to the ice." In a real scenario, if it is cold enough, their wet arms will freeze to the ice, which may hold them if the rescue is prolonged and they can't stay above the surface on their own.
Command No. 2: "Pull with your arms and kick with your feet." The sooner the victim can get their waist to come up in the water and pull with their arms, the better. The goal is to get their chest – and the majority of their bodyweight – over the ice’s edge.
Command No. 3: "Now roll on your side toward me." This will equalize the victim's load on the ice edge as much as possible and allow them to escape without point loading the ice and making a new hole or simply expanding the existing hole.
During this phase of the training exercise, have each participant practice giving each of those commands to the “victim.” Have the victim respond positively to the rescuer’s commands. And don’t tolerate victims who mess with the rescuer by not following commands. The purpose of this training is to upload the right behaviors and outcomes to the participants. The next time it might be for real. During the self-rescue coaching, rescuers should closely evaluate the victim's ability to comprehend and comply to coaching commands according to Zartman. If victim’s mental or physical capabilities are diminished, hypothermia has likely set in and they will continue to decline rapidly. This must prompt rescuers to immediately progress towards a more active rescue mode of operations.
For this training exercise, use the same scene setup used in the Victim Self-Rescue exercise.
If the victim is compliant and coherent, but simply can't get out of the hole, progress to reaching or throwing. When throwing or reaching, alert the victim to what you are about to do and then do it. This is usually a short window of opportunity.
Using the 35-foot extension ladder, mark a line far enough away from your hole in the ice (indicating the shoreline), but close enough that the 35-foot extension ladder can be used to reach the victim. Have teams of rescuers push the ladder across the “ice” out to the victim. Then have a rescuer in full structural PPE, wearing a personal floatation device, with a lifeline rope attached to them crawl out on the ladder to assist the victim in getting out of the hole and on to the ladder.
EXERCISE NO. 3: THROW MODE
For this training exercise, set up scene using Figure 2 below as your guide:
Using rope-rescue throw bags, mark your “shoreline” so that the hole in the ice is within reach of the rope in the throw bags. All personnel who approach the water's edge should have an approved PFD on and be wearing their turnout gear. Have participants in teams of two practice the proper technique for throwing the bag over the victim’s head so that the rope falls on the victim. Have a third member of the team providing verbal coaching to the victim so that they grab the rope. Have the rescuers pull the victim to safety.
CONDUCT A HOT WASH
In U.S. military circles, every operation or training exercise is immediately followed by a debriefing and review of what happened, called a “hot wash.” Conducting a similar activity should be part of any fire department training activities. I like to use the following criteria for my hot washes:
• Did we operate safely?
• Did we operate efficiently? Look at the process you developed. Did the exercise go according to the training plan? If no, what adjustments should be made before the next exercise? Find solutions, not fault.
• Did we operate effectively? Did we accomplish the objectives for the training exercise? Did the students acquire new knowledge and skills? Did they refine previously learned knowledge and skills?
ICE RESCUE TRAINING TAKEAWAYS
By completing this ice rescue training exercise, firefighters should be able to:
• Demonstrate the use of appropriate PPE and personal floatation devices that must be worn by all personnel participating in an ice rescue;
• Assess the victim’s physical ability to participate in self-rescue;
• Provide the necessary commands and guidance to the victim to engage in self-rescue;
• Select the appropriate strategy (reach or throw) for ice rescue when the victim is not capable of self-rescue; and
• Demonstrate the safe, effective and efficient use of equipment available from their fire apparatus for both reaching and throwing ice rescue techniques.
I strongly encourage you and members of your department to take in FireRescue1’s Ice Rescue videos. Together with Daylan's article, these videos can give your department’s personnel a good baseline for the knowledge, skills and abilities necessary to conduct an ice rescue safely, effectively and efficiently. Will conducting these training exercises make your personnel ice rescue experts? The short answer is no. The long answer is that they’ll be better prepared for an ice rescue than if they hadn’t, fair enough?
About the Author

Batt. Chief Robert Avsec (Ret.) served with the Chesterfield (Va.) Fire & EMS Department for 26 years. He was an instructor for fire, EMS, and hazardous materials courses at the local, state and federal levels, which included more than 10 years with the National Fire Academy. Chief Avsec earned his bachelor’s degree from the University of Cincinnati and his master’s degree in executive fire service leadership from Grand Canyon University. He is a 2001 graduate of the National Fire Academy's EFO Program. Contact Robert at Robert.Avsec@FireRescue1.com.